
点击上方 ,选择 设为星标
来源: cnblogs.com/rickiyang/p/11074232.html
作者: rickiyang
通常说的编码(Encoder)也就是发生在发送消息的时候需要将消息编译成字节对象,在Netty中即编译成ByteBuf对象。在java中我们将这种编译称之为序列化(Serializable),即将对象序列化为字节数组,然后用于传输或是持久化啊之类的。那么自然解码(Decoder)就是一个反序列化的过程,使用相应的编码格式对接收到的对做一个解码,以正确解析该对象。
Part1java序列化的弱点
谈到序列化我们自然想到java提供的Serializable接口,在java中我们如果需要序列化只需要继承该接口就可以通过输入输出流进行序列化和反序列化。但是在提供很用户简单的调用的同时他也存在很多问题:
@Test
public void testSerializable(){
  String str = "哈哈,我是一条消息";
  Message msg = new Message((byte)0xAD,35,str);
  ByteArrayOutputStream out = new ByteArrayOutputStream();
  try {
    ObjectOutputStream os = new ObjectOutputStream(out);
    os.writeObject(msg);
    os.flush();
    byte[] b = out.toByteArray();
    System.out.println("jdk序列化后的长度: "+b.length);
    os.close();
    out.close();


    ByteBuffer buffer = ByteBuffer.allocate(1024);
    byte[] bt = msg.getMsgBody().getBytes();
    buffer.put(msg.getType());
    buffer.putInt(msg.getLength());
    buffer.put(bt);
    buffer.flip();

    byte[] result = new byte[buffer.remaining()];
    buffer.get(result);
    System.out.println("使用二进制序列化的长度:"+result.length);
  } catch (IOException e) {
    e.printStackTrace();
  }
}
输出结果为:
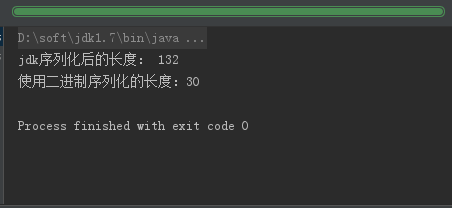
我们可以看到差距是挺大的,目前的主流编解码框架序列化之后的码流也都比java序列化要小太多。
@Test
public void testSerializable(){
  String str = "哈哈,我是一条消息";
  Message msg = new Message((byte)0xAD,35,str);
  ByteArrayOutputStream out = new ByteArrayOutputStream();
  try {
    long startTime = System.currentTimeMillis();
    for(int i = 0;i < 100000;i++){
        ObjectOutputStream os = new ObjectOutputStream(out);
        os.writeObject(msg);
        os.flush();
        byte[] b = out.toByteArray();
        /*System.out.println("jdk序列化后的长度: "+b.length);*/
        os.close();
        out.close();
      }
      long endTime = System.currentTimeMillis();
      System.out.println("jdk序列化100000次耗时:" +(endTime - startTime));

      long startTime1 = System.currentTimeMillis();
      for(int i = 0;i < 100000;i++){
        ByteBuffer buffer = ByteBuffer.allocate(1024);
        byte[] bt = msg.getMsgBody().getBytes();
        buffer.put(msg.getType());
        buffer.putInt(msg.getLength());
        buffer.put(bt);
        buffer.flip();

        byte[] result = new byte[buffer.remaining()];
        buffer.get(result);
        /*System.out.println("使用二进制序列化的长度:"+result.length);*/
      }
      long endTime1 = System.currentTimeMillis();
      System.out.println("使用二进制序列化100000次耗时:" +(endTime1 - startTime1));
  } catch (IOException e) {
      e.printStackTrace();
  }
}
结果为:

结果为毫秒数,这个差距也是不小的。
结合以上我们看到:目前的序列化过程中使用java本身的肯定是不行,使用二进制编码的话又的我们自己去手写,所以为了让我们少搬砖前辈们早已经写好了工具让我们调用,目前社区比较活跃的有google的Protobuf和Apache的Thrift。
Part2Protobuf序列化的使用
我们先来使用Protobuf进行序列化,他和XML,json一样都有自己的语法,xml的后缀是.xml,json文件的后缀是.json,自然Protobuf文件的后缀就是.proto(哈哈,当然不是全称)。
下面我们使用Protobuf来封装一段消息,通过一个案例简单介绍一下它的使用。
首先我们用Protobuf的语法格式来写一段需要序列化的对象,命名格式为:Msg.proto
option java_package = "cn.edu.hust.netty.demo10";
option java_outer_classname = "MessageProto";

message RequestMsg{
  required bytes msgType = 1;
  required string receiveOne = 2;
  required string msg = 3;
}

message ResponseMsg{
  required bytes msgType = 1;
  required string receiveOne = 2;
  required string msg = 3;
}
关于Message.proto中的语法格式,详情大家google一下相关的说明,网上很多介绍,再次简单就上面的语法说明一下:
字段修饰符:
字符类型稍微有些不同:double,float,int32,int64,bool(boolean),string,bytes。稍微有些不同,String,boolean,int有差别。
另外我们看到上面3个字段分别赋值了,这个值是什么意思呢?消息定义中,每个字段都有唯一的一个数字标识符。这些标识符是用来在消息的二进制格式中识别各个字段的,一旦开始使用就不能够再改变。注:[1,15]之内的标识号在编码的时候会占用一个字节。[16,2047]之内的标识号则占用2个字节。所以应该为那些频繁出现的消息元素保留 [1,15]之内的标识号。
关于Protobuf 的语法我们就简单的介绍这么多,更多细节大家自己去查阅文档吧。下面我们开始使用Protobuf 来进行序列化。
首先我们的在工程中引入protobuf的jar包,目前官方版本最高3.2,我们用3.0的吧:
    com.google.protobuf
    protobuf-java
    3.0.2
Protobuf的文件已经定义好了,下就需要把它编译成java代码,这里我们的借助到google为我们提供的脚本工具protoc。要注意protoc的版本需要和Protobuf的版本对应上,不然不同的版本之间会有一些差异解析可能会有问题。现在知道我们为啥非得选用protobuf3.0.2版本吧,因为我没有找到别的版本的protoc。。。
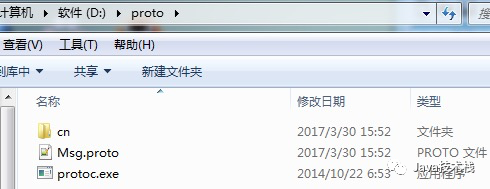
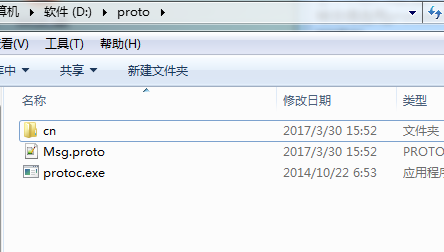
下载好了我们解压缩然后把刚才写好的Msg.proto文件复制进去。
接着我们进cmd输入如下命令:
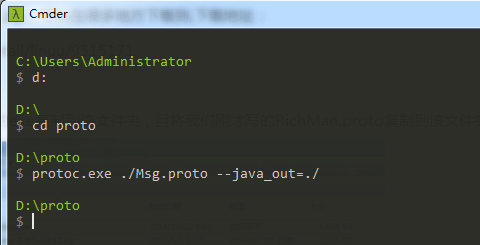
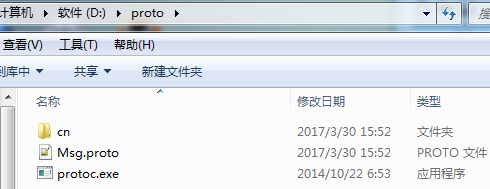
主要是第三句命令。如果你输入没有报错的话你的proto文件夹应该会生成一个子文件夹:
进去该文件夹你会看到已经生成了MessageProto.java文件,恭喜你,这时候你已经完成了protobuf序列化文件的生成。然后你把该文件拷贝至工程目录下。接下来我们用生成的文件去发消息吧。还是老套路服务端和客户端。
服务端:
public class ProtoBufServer {
  private int port;

  public ProtoBufServer(int port) {
    this.port = port;
  }

  public void start(){
    EventLoopGroup bossGroup = new NioEventLoopGroup();
    EventLoopGroup workGroup = new NioEventLoopGroup();

    ServerBootstrap server = new ServerBootstrap().group(bossGroup,workGroup)
                                .channel(NioServerSocketChannel.class)
                                .childHandler(new ServerChannelInitializer());

      try {
        ChannelFuture future = server.bind(port).sync();
        future.channel().closeFuture().sync();
      } catch (InterruptedException e) {
        e.printStackTrace();
      }finally {
        bossGroup.shutdownGracefully();
        workGroup.shutdownGracefully();
      }
  }

  public static void main(String[] args) {
    ProtoBufServer server = new ProtoBufServer(7788);
    server.start();
  }
}
服务端Initializer:
public class ServerChannelInitializer extends ChannelInitializer {
  @Override
  protected void initChannel(SocketChannel socketChannel) throws Exception {
    ChannelPipeline pipeline = socketChannel.pipeline();

    pipeline.addLast(new ProtobufVarint32FrameDecoder());
    pipeline.addLast(new ProtobufDecoder(MessageProto.RequestMsg.getDefaultInstance()));
    pipeline.addLast(new ProtoBufServerHandler());
  }
}
服务端handler:
public class ProtoBufServerHandler extends ChannelInboundHandlerAdapter {
  @Override
  public void channelActive(ChannelHandlerContext ctx) throws Exception {
      MessageProto.ResponseMsg.Builder builder = MessageProto.ResponseMsg.newBuilder();
      builder.setMsgType(ByteString.copyFromUtf8("CBSP"));
      builder.setReceiveOne("小红");
      builder.setMsg("你好,你有啥事");

      ctx.writeAndFlush(builder.build());
  }


  @Override
  public void channelRead(ChannelHandlerContext ctx, Object msg) throws Exception {
      MessageProto.RequestMsg m = (MessageProto.RequestMsg)msg;
      System.out.println("Client say: "+m.getReceiveOne()+","+m.getMsg());
  }

  @Override
  public void exceptionCaught(ChannelHandlerContext ctx, Throwable cause) throws Exception {
      super.exceptionCaught(ctx, cause);
      ctx.close();
  }
}
客户端:
public class ProtoBufClient {
  private  int port;
  private  String address;

  public ProtoBufClient(int port, String address) {
      this.port = port;
      this.address = address;
  }

  public void start(){
    EventLoopGroup group = new NioEventLoopGroup();

    Bootstrap bootstrap = new Bootstrap();
    bootstrap.group(group)
            .channel(NioSocketChannel.class)
            .handler(new ClientChannelInitializer());

    try {

        ChannelFuture future = bootstrap.connect(address,port).sync();
        future.channel().closeFuture().sync();
    } catch (Exception e) {
        e.printStackTrace();
    }finally {
        group.shutdownGracefully();
    }

  }

  public static void main(String[] args) {
    ProtoBufClient client = new ProtoBufClient(7788,"127.0.0.1");
    client.start();
  }
}
客户端Initializer:
public class ClientChannelInitializer extends  ChannelInitializer {

  protected void initChannel(SocketChannel socketChannel) throws Exception {
    ChannelPipeline pipeline = socketChannel.pipeline();

    pipeline.addLast(new ProtobufVarint32LengthFieldPrepender());
    pipeline.addLast(new ProtobufEncoder());
    pipeline.addLast(new ProtoBufClientHandler());
  }
}

客户端handler:

public class ProtoBufClientHandler extends ChannelInboundHandlerAdapter {
  @Override
  public void channelRead(ChannelHandlerContext ctx, Object msg) throws Exception {
      MessageProto.ResponseMsg m = (MessageProto.ResponseMsg)msg;
      System.out.println("Server say: "+m.getReceiveOne()+","+m.getMsg());
  }

  @Override
  public void channelActive(ChannelHandlerContext ctx) throws Exception {
      MessageProto.RequestMsg.Builder builder = MessageProto.RequestMsg.newBuilder();
      builder.setMsgType(ByteString.copyFromUtf8("CBSP"));
      builder.setReceiveOne("小明");
      builder.setMsg("你好,我找你有事");

      ctx.writeAndFlush(builder.build());
  }

  @Override
  public void channelInactive(ChannelHandlerContext ctx) throws Exception {
      System.out.println("Client is close");
  }
}
启动服务端和客户端,输出如下:
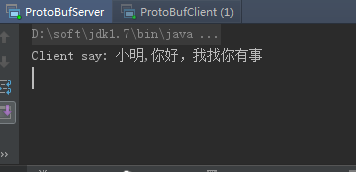
最简单的protoBuf应用案例我们就写完了,真实的使用场景大同小异,随机应变即可。
— END–
限 时 特 惠: 本站每日持续更新海量各大内部创业教程,一年会员只需98元,全站资源免费下载 点击查看详情
站 长 微 信: lzxmw777