
摘要
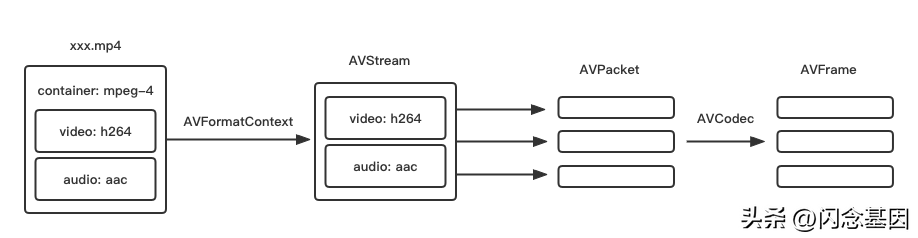
这篇文章介绍怎么实现视频解码,具体步骤为读取Sample.mkv视频文件,从中提取视频流,然后解码为YUV图像数据,把YUV数据存储为PGM灰度图像,或者存储为YUV420p RAW格式视频。
初始化FFmepg和FormatContext
使用FFmpeg API第一个操作就是执行初始化函数:av_register_all注册所有相关组件,然后使用avformat_open_input打开指定的媒体文件,并使用avformat_find_stream_info获取媒体流相关信息,把这些格式信息映射到AVFormatContext *mFormatCtx这个结构中。
使用函数av_dump_format可以从控制台输出媒体文件相关信息。
bool VideoDecoding::init(const char * file)
{
    av_register_all();
    if ((avformat_open_input(&mFormatCtx, file, 0, 0)) < 0) {
        printf("Failed to open input filen");
    }
    if ((avformat_find_stream_info(mFormatCtx, 0)) < 0) {
        printf("Failed to retrieve input stream informationn");
    }
    av_dump_format(mFormatCtx, 0, file, 0);
    return false;
}
查询媒体流序号
多媒体文件一般都有一个视频流和多个音频流或者字幕流,每个媒体流都有序号Index。新版本的API使用av_find_best_stream函数查询相应的媒体流,第一个参数为初始化后的媒体格式Context,第二个参数即为媒体类型:
– AVMEDIA_TYPE_VIDEO:视频流
– AVMEDIA_TYPE_AUDIO:音频流
– AVMEDIA_TYPE_SUBTITLE:字幕流
后面几个参数是指定流特性的,如果从多个音频流中选择一个的话可以进行相关设置。此时只有一个视频流,所以参数设为-1即可返回默认的媒体流Index,得到这个Index后,接下来可以根据这个Index读取所需要的流。
bool VideoDecoding::findStreamIndex()
{
    // Find video stream in the file
    mVideoStreamIndex = av_find_best_stream(mFormatCtx, AVMEDIA_TYPE_VIDEO, -1, -1, NULL, 0);
    if (mVideoStreamIndex < 0) {
        printf("Could not find stream in input filen");
        return true;
    }
    return false;
}
配置编解码器CodecContext
首先使用avcodec_find_decoder函数根据流Index查找相应的解码器。
然后使用avcodec_alloc_context3函数根据解码器申请一个CodecContext。
接着根据流数据填充CodecContext各项信息。
最后完成CodecContext初始化操作。
// Initialize the AVCodecContext to use the given AVCodec.
bool VideoDecoding::initCodecContext()
{
    // Find a decoder with a matching codec ID
    AVCodec *dec = avcodec_find_decoder(mFormatCtx->streams[mVideoStreamIndex]->codecpar->codec_id);
    if (!dec) {
        printf("Failed to find codec!n");
        return true;
    }
    // Allocate a codec context for the decoder
    if (!(mCodecCtx = avcodec_alloc_context3(dec))) {
        printf("Failed to allocate the codec contextn");
        return true;
    }
    // Fill the codec context based on the supplied codec parameters.
    if (avcodec_parameters_to_context(mCodecCtx, mFormatCtx->streams[mVideoStreamIndex]->codecpar) < 0) {
        printf("Failed to copy codec parameters to decoder context!n");
        return true;
    }
    // Initialize the AVCodecContext to use the given Codec
    if (avcodec_open2(mCodecCtx, dec, NULL) < 0) {
        printf("Failed to open codecn");
        return true;
    }
    return false;
}
领取音视频开发学习资料:音视频开发(资料文档+视频教程+面试题)(FFmpeg+WebRTC+RTMP+RTSP+HLS+RTP)
读取视频数据进行解码
这里有两个概念:packet和frame。可以简单地理解为包packet为编码的数据结构,帧frame为解码后的数据结构。
使用av_read_frame函数从FormatContext中循环读取packet,每读到一个packet先根据流Index判断是否是需要的媒体流,如果是需要的视频流就进行下一步解码操作。
新版本的API里面编解码统一使用avcodec_send_packet和avcodec_receive_frame这一对函数对媒体文件进行编解码操作,实现从packet到frame的相互转换(解码和编码)。此时是解码,从函数名字可以理解为向处理器发送一个packet,处理器实现自动解码,然后再从处理器接收一个解码后的frame。旧版本APIavcodec_decode_video2这一系列编解码函数已经弃用了。
这个步骤只进行视频解码,解码后的数据可以进行各种操作。
bool VideoDecoding::readFrameProc()
{
    AVPacket packet;
    AVFrame *frame = av_frame_alloc();
    int tmpW = mFormatCtx->streams[mVideoStreamIndex]->codecpar->width;
    int tmpH = mFormatCtx->streams[mVideoStreamIndex]->codecpar->height;
    char outFile[40] = { 0 };
    sprintf(outFile, "../assets/Sample_%dx%d_yuv420p.yuv", tmpW, tmpH);
    FILE *fd = fopen(outFile, "wb");
    while (int num = av_read_frame(mFormatCtx, &packet) >= 0) {
        // find a video stream
        if (packet.stream_index == mVideoStreamIndex) {
            decodeVideoFrame(&packet, frame, fd);
        }
        av_packet_unref(&packet);
    }
    fclose(fd);
    printf("Generate video files successfully!nUse ffplay to play the yuv420p raw video.n");
    printf("ffplay -f rawvideo -pixel_format yuv420p -video_size %dx%d %s.n", tmpW, tmpH, outFile);
    return false;
}
bool VideoDecoding::decodeVideoFrame(AVPacket *pkt, AVFrame *frame, FILE *fd)
{
    avcodec_send_packet(mCodecCtx, pkt);
    int ret = avcodec_receive_frame(mCodecCtx, frame);
    if (!ret) {
        // 2种保存YUV数据的方式
        // 保存为未压缩的YUV视频文件
        saveYUV(frame, fd);
        // 保存为PGM灰度图像文件
        //savePGM(frame);
        printf("."); // program running state
        return false;
    }
    return true;
}
保存解码后的YUV数据
上一步进行了视频解码,要想验证是否真的解码成功就要保存YUV数据为可以查看的格式。可以把每一帧图像存为一副图像,也可以保存为YUV420p格式视频文件。
保存为YUV420p视频
YUV420视频格式如下图所示(引用自维基百科):
YUV像素个数为4:1:1,Y分量个数为图像尺寸h*w,UV分量个数都是h*w/4。
YUV420p中的字母p表示planar平面模式,即YUV分量按顺序排列存储,还有另外一个YUV420sp,表示UV分量是交错排列的。
解码后得到的frame->data结构是一个多维数组,此时data[0] data[1] data[2]分别为YUV分量的数据。
bool VideoDecoding::saveYUV(AVFrame *frame, FILE *fd)
{
    fwrite(frame->data[0], 1, mCodecCtx->width *mCodecCtx->height, fd);
    fwrite(frame->data[1], 1, mCodecCtx->width*mCodecCtx->height / 4, fd);
    fwrite(frame->data[2], 1, mCodecCtx->width*mCodecCtx->height / 4, fd);
    return false;
}
把每一个frame的未压缩YUV数据都写入到一个文件中就是YUV420p格式的原生视频数据了,可以直接使用FFmpeg中的ffplay命令进行播放,播放的参数为:ffplay -f rawvideo -pixel_format yuv420p -video_size 1280×534 file.yuv,注意指定其图像尺寸。
保存为PGM灰度图像
PGM(portable graymap format)图像格式是一种简单的未经压缩的灰度图像格式。用纯文本文件打开PGM文件可以看到,文件第一行以字符‘P5’作为标记,第二行为宽度和高度,第三行为灰度值最大值,接下来的内容为像素灰度数据。
PGM为灰度图像,所以这里只需把解码后的frame->data[0]所指向的Y分量数据保存到文件即可。
// pgm: Portable Gray Map
bool VideoDecoding::savePGM(AVFrame * frame)
{
    static int frameNum = 0;
    char pgmFile[30];
    sprintf(pgmFile, "../assets/frame%d.pgm", frameNum++);
    FILE *pFile = fopen(pgmFile, "wb");
    fprintf(pFile, "P5n%d %dn%dn", frame->width, frame->height, 255);
    for (int i = 0; i height; i++) {
        // Y
        fwrite(frame->data[0] + i*frame->linesize[0], 1, mCodecCtx->width, pFile);
    }
    fclose(pFile);
    return false;
}
释放系统资源
最后不要忘记释放CodecContext和FormatContext资源,这里我们可以在析构函数里面进行释放。
VideoDecoding::~VideoDecoding()
{
    avcodec_free_context(&mCodecCtx);
    avformat_close_input(&mFormatCtx);
}
限 时 特 惠: 本站每日持续更新海量各大内部创业教程,一年会员只需98元,全站资源免费下载 点击查看详情
站 长 微 信: lzxmw777